
Last June 2017, I managed to snag a return flight from Manila to Seoul in just under a $100. I didn’t even have a visa yet but since it was cheap, I didn’t mind losing some money in case my visa application will be denied.
Had I let go of that chance and book on a later date, I would have spent 3x the amount, thus, losing more money in the process.
Since my flight wasn’t due until November, I thought I had all the time in the world to plan a decent itinerary good for 9 days and more than enough time to apply for a visa.
But guess what? I wasn’t able to plan for anything and I even got my visa a day before my flight leaves!
You can read more about my misadventures [aka lack of preparation] in Seoul here.
When I arrived in Seoul, all I ever had was a hostel reservation in Backpackers Inside, which cost $16/night. This hostel was not the cheapest but I went for it because of the location, amenities, wifi access, cleanliness, and how accommodating the hosts were. All of these I read from the reviews available online.
5 Reasons WHY You Should Stay at Backpackers Inside:
- It is located near Hyehwa subway station and near a University. And because it’s near a University, a lot of affordable restaurants can found just a walking distance from the hostel.


- It has a cozy, almost homey, vibe. The common area is such a good place to meet other travelers. And I did meet a lot.
- Toilets and baths are always clean. Rooms are cleaned every day.
- Strong internet connection is available not just in the common area but also inside the rooms.
- The hostel owners are very accommodating. Upon checking in, the hosts will give you the most reliable map that I’ve used until my last day in Seoul, food recommendations, and MUST SEE places especially if you don’t have much time to spare.
Indeed, it was a good decision staying at Backpackers Inside.
![]()
![]()
From the airport, there are 2 ways to get to your hostel:
1) via Airport limousine bus
There are several airport buses available but you have to board the right bus number, otherwise, you might end up in an entirely different city. To know which bus to take, contact your hostel and ask. For Backpackers Inside, you will have to take bus #6011.
I paid 10,000 KRW for this bus and travel time was 55 minutes.
For more info about airport limousine bus, click here.
Note: Research about the departure times of the bus you’re going to take and know that these buses don’t operate 24 hours.
2) via Airport Express (AREX) Train
- Express train. A 43-minute ride from Incheon Int’l airport to Seoul Station. The cost is 8,000 KRW.
- All-stop train. A 58-minute ride from Incheon Int’l airport to Seoul Station. The cost is 4,250 KRW.
If you’re not in a rush, I highly suggest that you take the all-stop train. For more info, click here.
From Seoul Station, you can easily find your next stop since all lines are connected. Korea’s public transportation is very convenient and easy to navigate.
Getting around the city is cheap and easy with the subway station and bus stops located almost everywhere. You just have to buy yourself a T-Money card, a reloadable card that is accepted in both subway and buses.
Note: Before buying your own T-Money card, ask first your hostel if they have one that you can rent because that will save you 3,000 KRW. Otherwise, you can easily purchase one at the airport or in any subway station. The cost for the card alone is 3,000 KRW; you will still have to load it to be able to use it.
The 3,000 KRW is non-refundable. If you have credits at the end of your trip, you can refund it at the airport or in any convenient stores.
You can read more about Korea’s transportation system here.
Now, here’s how I spent those 9 days:
Day 1 [Saturday] – Deoksugung Palace, Gwanhwamun Square, National Museum of Korean Contemporary History

Deoksugung Palace. One of the must-see sights of Seoul is the Sumumjang, the changing of the royal guard ceremony that takes place every day, three times a day, at the main gate. Entrance fee: 1,000 KRW.

Gyeongbokgung Palace is arguably the most beautiful, and remains the largest of all five palaces. Entrance fee: 3,000 KRW.

Two statues of Admiral Yi Sun-Shin and Sejong the Great, who are great and influential people in Korean history, are situated at Gwanghwamun Square where the beatification ceremony will take place.
Day 2 [Sunday] – Insadong, Jogyesa Temple, Tapgol Park, Lantern Festival

A street showcasing traditional Korean culture with antique art and book stores, traditional tea houses, and craft shops. It is Seoul’s leading gallery street as it has long been home to various art galleries.

A “hallyu festival” that highlights the cultural heritage of of Korea, including its folk culture, gimjang (making kimchi), and royal culture through lanterns made of beautifully-colored hanji, a traditional Korean paper. Held every year in November.
Make your own lantern is the highlight of this festival for me. The cost of making your own lantern is 3,000 KRW.

A historic site where 33 representatives of the March 1st Movement of 1919 recited the Korean Declaration of Independence from Japan and shouted “all hail independence”.

One of Korea’s most famous Buddhist temples. It offers temple life and temple stay programs for foreigners.
Day 3 [Monday] – Downtime
 Since most palaces and certain markets are closed on Mondays, I decided to just stay in a coffee shop the entire day and work on this blog. It has been a month since I last wrote an article. It did me good because at the of the day, I was able to write 4 articles.
There are a lot of coffee shops in Seoul, both local and international brands. What I don’t understand is the people’s obsession with Starbucks. Nothing against Starbucks, but local cafes offer a much better coffee at half the price! I really don’t get it but to each his own.
As for me, I stayed at Paris Baguette, which was just a 5-minute walk from the hostel. This cafe has such a good vibe, strong internet connection, and good pastries at affordable prices.
Day 4 [Tuesday] – Korean for a day and went around Changdeokgung and Changgyeonggung Palaces
I went with a couple of guys from the hostel and became Koreans for a day. That meant renting Hanbok, Korea’s national costume, went around palaces and took a lot of photos.
Changdeokgung Palace. Changdeokgung Palace was the second royal villa built following the construction of Gyeongbukgung Palace in 1405. It was the principal palace for many kings of the Joseon Dynasty, and is the most well-preserved of the five remaining royal Joseon palaces. Entrance fee: 1,000 KRW
Changgyeonggung Palace. Located in the heart of Seoul, Changgyeonggung Palace was first built by the 4th ruler of the Joseon Dynasty, King Sejong (r.1418-1450), for his retiring father, King Taejong. It often served as residential quarters for queens and concubines. During the reign of King Seongjong (r.1469-1494), the palace was renovated and renamed to Changgyeonggung Palace. It later became a park with a zoo and a botanical garden during Japanese colonial rule. The palace was then relocated in 1983 and regained its old grace after years of restoration. Entrance fee: 3,000 KRW.


I highly recommend that you rent a Hanbok before going inside palaces because wearing a Hanbok automatically waives the entrance fees.
Rental rates can start to as low as 10,000 KRW to as high as 40,000 KRW good for 2 hours, 4 hours, or 24 hours. Hanbok for men normally costs more because it’s a 3-piece suit. Also, add-ons such as hat, small bag, shoes, even hair and make-up cost a minimum of 5,000 KRW each.
I rented mine for 12,000 KRW because I didn’t want to spend much, and the guys spent 22,000 KRW for their Hanboks.
You can find a lot of Hanbok rental shops near the palaces. If you want to book in advance, you may do so through Klook.
Note: if you are planning to do this in Autumn or Winter, make sure you have enough clothes underneath to keep you warm.
Day 5 [Wednesday] – Pyeonghwa Market, Gwangjang market, Dongdaemun Design Plaza and Fashion Town


Dongdaemun Design Plaza (DDP) has a meaning of Dream, Design, and Play. It holds various exhibitions, fashion shows, forums, conferences, and other domestic and international events.
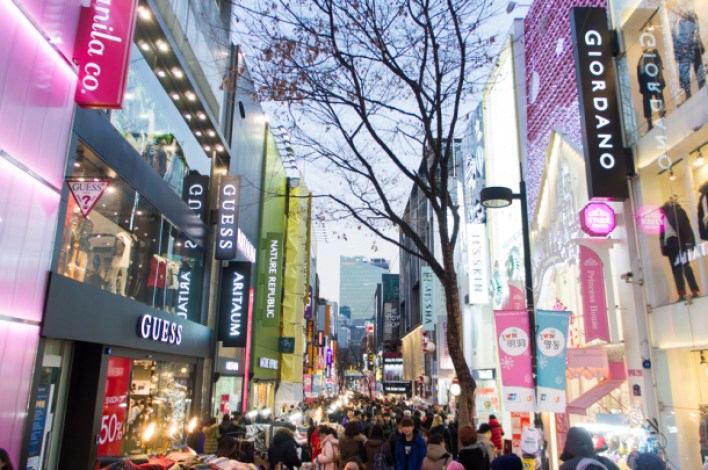
Day 6 [Thursday] – Myeong-dong, Bukchon Hanok Village, Unhyeongung Palace, Jogyesa Temple at night
Met up with a friend, who arrived a day before together with a few other friends (also from the Philippines ), and we went around Myeongdong, Seoul’s shopping district, Unhyeongung Palace, Jogyesa Temple at night and Bukchon Hanok Village.

Bukchon Hanok Village is home to hundreds of traditional houses, called hanok, that date back to the Joseon Dynasty. The name Bukchon, which literally translates to “northern village,” came about as the neighborhood lies north of two significant Seoul landmarks, Cheonggyecheon Stream and Jongno.

Unhyeongung Royal Residence was the home of young Gojong, who later became Emperor during the Joseon Dynasty.
Day 7 [Friday] – Nami Island
You can take a trip to Nami Island in 2 ways:
1) Book a tour
You can easily book a tour in advance via Klook. The cost is 25,000 KRW [already including the ferry ride].
PROS: you don’t have to worry about missing the bus from Gapyeong to Nami ferry, and guaranteed seating from Seoul to Gapyeong and back to Seoul.
CON: It takes a longer time to get there and back. Travel time is 2.5 hours.
![]()
![]()


2) Do it yourself
From Yongsan station, board the ITX train bound for Gapyeong. The platform will be on the same platform as the subway trains but with the given departure time, you won’t make the mistake of boarding the wrong train. Plus, the seats look different from the normal train.
The cost is 5,200 KRW and travel time is 55 minutes.
From Gapyeong, take the bus just outside the Gapyeong station. Bus trips run simultaneously with the arrival of trains coming from Yongsan station and it runs every hour. So if you missed the bus, you can either wait for the next one or take a taxi.
The bus fare cost 6,000 KRW. The fare is already good round trip so make sure to keep your ticket. It also stops at Petite France, which is also worth a visit.
The bus ride from Gapyeong to Nami ferry is around 30 minutes. Once you reach Nami ferry, buy a ticket, which costs 8,000 KRW, and board the ferry. Ferry leaves every 5 minutes and takes around 7 minutes to reach the island.
Travel time from Yongsan station to Nami Island: 1.5 hours
Total cost: 24,400 KRW
PRO: Shorter travel time
CONS: Risk of missing the bus from Gapyeong to Nami ferry and back. The train back to Yongsan is almost always full, so you have to stand the entire trip [55 minutes total].
Note: the last bus from Nami to Gapyeong is at 6:25pm. Failure to catch this bus would only mean taking a taxi, which costs around 30,000 KRW one way.


Day 8 [Saturday] – DMZ tour; Night out
We booked this tour via Klook and paid for the half-day tour with lunch. We were picked up at around 8am at the assigned pick up location. We were dropped off at Insa-dong where our lunch was waiting.
I strongly advise that you read about the Korean war beforehand so you can appreciate more what this tour is all about.
What to expect from this tour:
- Imjingak Park (Freedom Bridge, Memorial Stone)
- Dorasan Station
- Dora Obeservatory
- The 3rd infiltration Tunnel
- DMZ Theater / Exhibition Hall – Ginseng Center or Duty Free Shop
- Lunch at Insa-dong
This tour cost 55,000 KRW. If you prefer not to have lunch included, cost is 46,000 KRW.
![]()
![]()
After the tour, we walked around the city, did some shopping, took a lot of photos, and had dinner at one of the restaurants highly recommended and frequented by the locals. We wouldn’t have known about this place if not for a friend who’s currently working and living in Seoul.
This restaurant is known for its Tosokchon Samgyetang (Ginseng Chicken soup). It’s a bit pricey (16,000 KRW) but definitely worth trying.
You can find this superb delicacy at this address: 5, Jahamun-ro 5-gil, Jongno-gu, Seoul. Not many tourists, or travel bloggers, know this place. I was just lucky to have had a local insider tip.


Day 9 [Sunday] – DOWNTIME
After spending 8 days going around the city, I’ve decided to just relax on my last day. I slept in, did some last minute shopping, spent the rest of the day in a coffee shop and worked on this blog until it’s time to go to the airport and catch my flight.
I went to the airport via AREX all-stop train because it’s cheaper and I had enough time to spare.
You may ask, why 9 days and not just a weekender? Because I don’t want to rush through every city and country I go to. I want to experience more the local culture and take my time exploring the city. I don’t want a jam-packed itinerary, trying to fit everything in 3 days time, that would just tire me completely at the end of each day.
MORE TIPS:
If you don’t have as much time to spare, you can squeeze all these in 2-3 days but be prepared to be dead tired at the end of each day. Also, Seoul is a walkable city. So rather than spending subway fare especially if you’re only going 2-3 stations away, I suggest that you just walk. It’s good for your health anyway and you will have interesting finds along the way.
Some went to Everland but my friend and I weren’t keen in going to any theme parks (Everland and Lotte World), because we’ve read reviews that it’s not as good as Disneyland Hong Kong or Universal Studios in Singapore. So we opted in doing something else.
In terms of staying online, you can either buy a SIM card or rent a 4G Wifi Device, which can be claimed at the airport. Order yours in advance via Klook.
There’s so much more you can do in Seoul and Klook made it easy for you! Visit Klook now for more information.

Before I end this post, and as the title would suggest, here’s a breakdown of my expenses in Seoul:
| Details | In KRW | In USD | Average Spending per Day (in USD) | % Contribution |
| Hostel | 148,500.00 | $141.43 | $15.71 | 33% |
| DMZ Tour | 55,000.00 | $52.38 | — | 12% |
| Nami Island | 25,000.00 | $23.81 | — | 5% |
| Food | 165,550.00 | $157.67 | $17.52 | 36% |
| Transportation | 35,350.00 | $33.67 | $3.74 | 8% |
| Misc | 26,700.00 | $25.43 | $2.83 | 6% |
| TOTAL | 456,100.00 | $434.38 | $39.80 | 100% |
Note: $1 = 1050 KRW
As you can see, 70% of total expenses came from hostel and food, which is normal since I need to eat and a place to stay. One of the reasons I went to Korea was because of the food so I didn’t deprive myself of Korean food. Everything I saw along the way, especially street food, I didn’t hesitate buying. My meals went from as low as 3,000 KRW to as high as 16,000 KRW per meal per person.
Also, I didn’t include DMZ tour and Nami Island in my average spending per day because I consider those are isolated instances.
Transportation expense accounts for the subway and bus rides I took. Bus fares and subway fares cost around 1,250 KRW per trip.
As for the misc expenses, it includes Hanbok rental, entrance fees, cost of lantern, and stuff I bought in convenient stores.
I didn’t include any shopping expense because those are highly relative. If you’re a shopaholic, then you might want to increase your budget. As for me, I didn’t shop a lot because I didn’t want any problems with excess baggage. The total money I spent in shopping was only 30,000 KRW ($30).
Seoul is considered to be one of the most expensive cities to visit in East Asia. If you are traveling on a budget, there are still a lot of ways to travel cheaper in Seoul – choose a much cheaper accommodation, set a budget for meals per day, choose to walk than to take the subway, etc.
Seoul is more than just a sightseeing destination. Know about its history and you’d be able to appreciate more what this city has to offer.
For more information about Seoul’s history, visit this site.
I do hope you find this Seoul travel guide helpful. If you have anything to add or questions, please feel free to reach out. Thank you for stopping by and sending you love from my side of the world!
Pin for later!
