
Setting up a blog can be done in minutes but to start a blog worth reading takes more time, a lot more.
I have read a lot of blogs stating how you can easily start a blog in just 10 minutes and while that is true, the following should also be considered:
- the time for finding your niche
- the time for choosing the RIGHT domain name
- the time for researching which hosting will be used
- the time for selecting the perfect THEME – colors, fonts, layout, etc.
- the time for researching all the necessary plugins and knowing how to set it up and make it work
- the time for writing at least 20 quality and relevant posts before launching
- the time to come up with the effective digital marketing strategies for your blog
- the time to sign up with affiliate programs
Doing all these, and more, will definitely take more than 10 minutes. So, why 60 days? It actually depends on your schedule. If you plan on working on your blog 8-10 hours a day then it could be ready for launching in 30 days or less. Or if you are working on it part-time, then it could take more than 60 days.
So, shall we begin?
Note: this post may contain affiliate links, which means I may earn a commission for any purchases that you make on certain links to products/services at no additional cost on your end.

Before we proceed with the setup, let us start first with the WHY.
Why do you want to start a blog? I am hoping that you have bigger goals and a deeper reason than just financial gains. I hope you are starting this blog because you want to inspire people by sharing your experiences, because you want to share your knowledge that will help people address their pain points, and because you stand for something and you want to use your blog as your voice.
 If you are only doing it for financial reasons, you may find yourself easily demotivated and frustrated if you are not getting the results that you desire. So before you start a blog, make sure you have a steady income to release you of the pressure of monetizing your blog.
Whatever reasons you may have for starting a blog, I do hope that you are doing it for the right reasons. Doing it right will drive you to consistently work on your blog and write quality content.
For those contemplating, whether or not they should start a blog, know that it’s not a walk in the park. It will definitely push you to your limits and test your patience and determination. Blogging will give you long-term gains so don’t expect to earn high income and live on that income solely in your first few months of blogging.
In this post, I’ve come up with a 6-step guide on how to start your own blog. Let’s begin.
1) Finding your niche.
To find your niche, first ask yourself these questions:
What message do I want to convey to my readers?
What subject matter do I consider myself as an expert, or at least, highly knowledgeable?
What experiences have I had that people can relate to and serve as an inspiration?
 The answers to these questions will help you find your niche. Take this blog for instance. This blog aims to inspire people to create the life that they want by cultivating their passion, to strive for financial independence, and establish a sustainable travel lifestyle.
It may seem broad but the experiences I have shared, and will be sharing, in this blog revolve around these central themes. Here’s how:
- I quit my job and gave up my comfortable lifestyle to travel halfway across the world.
- The life that I want involves going to new places and having rich and cultural experiences.
- I need to be financially independent so I can create a sustainable travel lifestyle.
You can, of course, write whatever you want but if you want to be a successful blogger, everything you write about should be connected because that will show your readers how knowledgeable you are with your chosen niche, and therefore, establish trust and credibility.
2) Setting up your Blog
Now, let’s proceed with the technical aspect of starting a blog.
- Finding that Perfect Domain Name
 Domain name is the name of your site. For instance, iamsonhadora.com is the domain name of this blog. When you go to the home page, I am Sonhadora is the name that you’ll see as heading. It also serves as the brand name of your blog.
Domain name is the name that your readers will remember you by. How do you come up with your domain name? It’s easy as long as you take note of the following:
- Easy to type
- Should be memorable and unique
- Keep it short
- Use keywords
- Should have relevance to your central theme
- Avoid using hyphens, numbers and double letters
- Stick with .com extension as much as possible
- Make sure it’s not registered. You can use this website to check if your preferred domain name is available.
Read more about choosing the perfect domain name here.
Coming up with a domain name could take minutes or days. This is a crucial step because all your content and marketing strategies will revolve around this domain name. Also, avoid choosing a “Me Too” kind of name. If you’re a travel blogger, for instance, try not to use the words nomad, travel and backpacker because most likely, these words are already used by long-time and successful bloggers in your chosen niche.
So take your time and don’t stop until you are convinced and happy with your choice. Once you have chosen your domain name, don’t register yet. And I will tell you why on the next step.
- Choosing the best hosting company for your blog
 In simple terms, hosting is like a hard drive for your blog. All your articles and media files (photos and videos) need storage and that’s where hosting comes in. There are a lot of hosting service companies to choose from but to help you decide, I recommend Bluehost.
Bluehost offers different packages that are suitable for your needs and with great value, and has 24/7 customer support service. Also, when you go with this company, registering your domain name is already included in the packages and comes at no cost. For this blog, I chose only the basic package and I can easily upgrade if necessary.
Another thing, from the packages, you can either go with a 1-year, 3-year, or 5-year plan. In my case, I went with the 3-year plan because it’s cheaper and I am serious about making this blog a success and last a long time. Choosing a 3-year plan also relieves me of renewing every year. And since it’s a one-time payment, I only have to worry about the cost during the initial stages.
- Installing WordPress
 Bluehost has a one-click WordPress installation. How to do it? Simply login to your Bluehost account, go to home/dashboard and then click Install WordPress.
Once successfully installed, you will be redirected to WordPress login page. You will need to create a username and password, and once you are logged in, you can now begin to customize your website. It’s that easy!
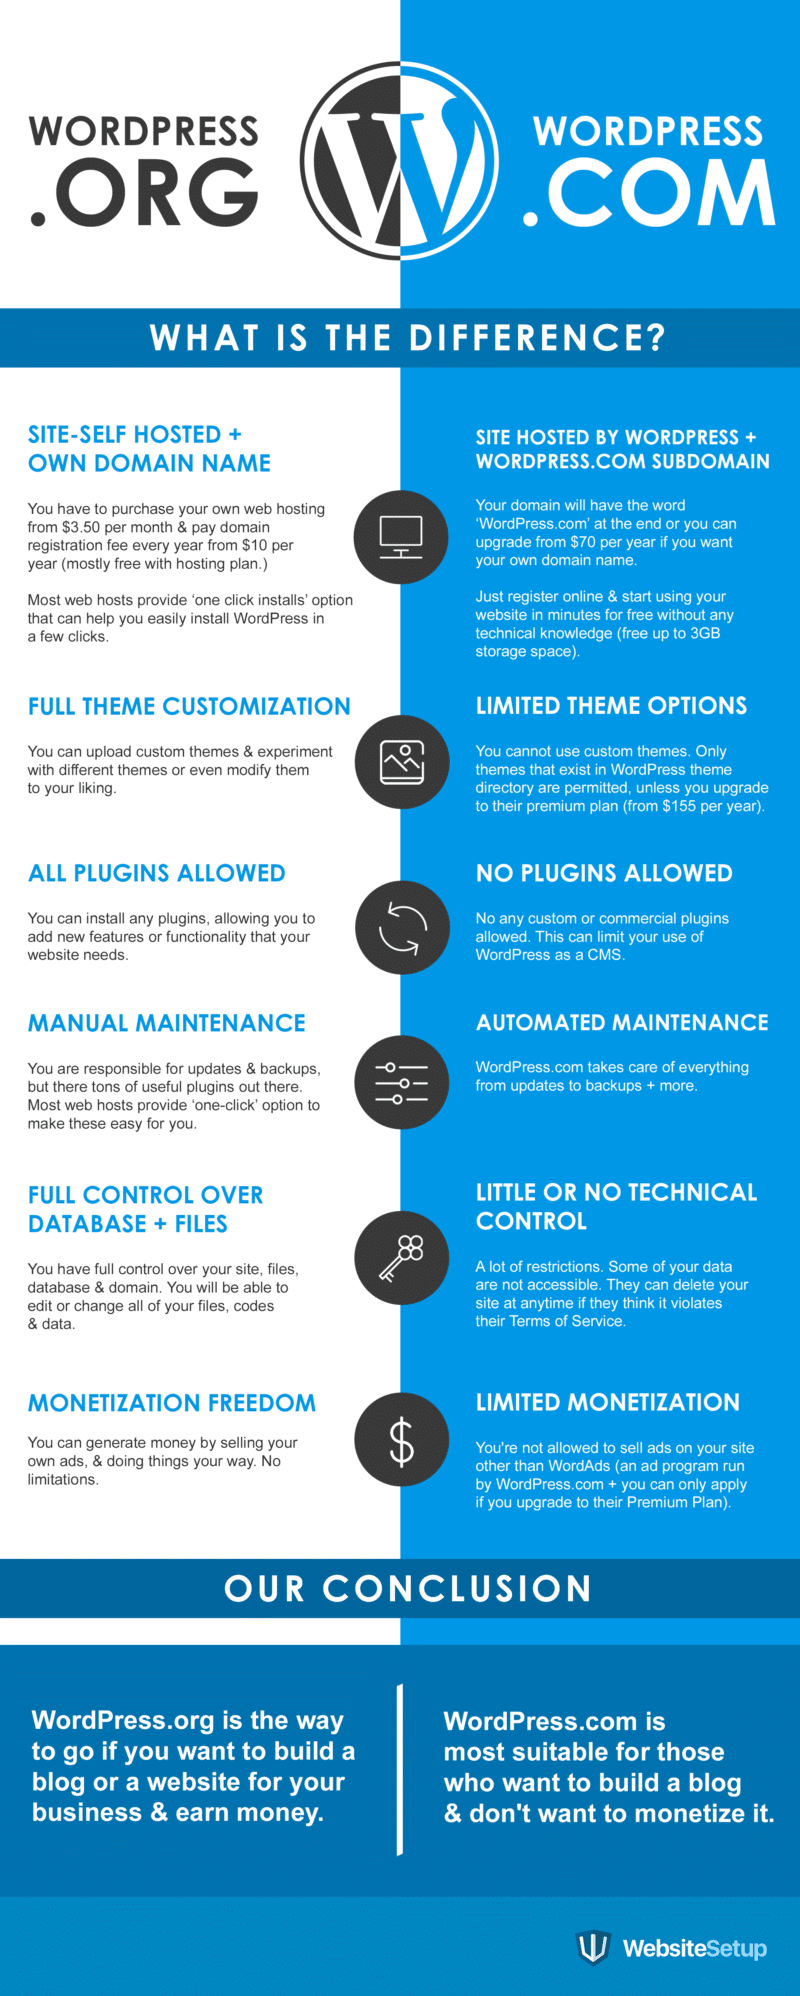
Now you may come across 2 WordPress sites — WordPress.org and WordPress.com — and here’s the difference:

Source: Bit Rebels
If you want to be taken as a serious blogger, then choose a self-hosted site. You will never go wrong with that. [Note: Bluehost is an accredited hosting provider for WordPress.org.]
Lastly, there are other platforms other than WordPress (i.e. Blogspot, Tumblr, Wix, etc.) but I highly recommend that you go with WordPress.
- Choosing a THEME
Choosing a theme is another time-consuming task. And if you’re a perfectionist or OC, then I suggest you hire an expert to save you some time. But if you want to do it yourself, it is doable and does not require technical skills.
You may ask whether to go with FREE theme or purchase one. In my honest opinion, if you are just starting, I suggest that you go first with the FREE themes. WordPress has thousands of FREE themes available, it will just take time to filter and choose several options that you will work with. You can install as many as you want. In my case, I installed around 10 themes and tested each one, then choosing the best one that I can work with.
How to install a theme: Go to your dashboard –> appearance –> themes

When choosing a theme, consider the font and colors for your blog. You can easily make minor changes but if you want to tweak a lot, then a coding skill will be necessary. Also, when choosing a theme, make sure it’s a RESPONSIVE theme.
What does it mean? It means that your website can easily adjust if viewed on different devices. You would want your website to be mobile/tablet-ready for aesthetic purposes and to give your readers an easy time browsing through your site.
As much as possible, set a timeline for this otherwise, a month can go by without you noticing and all you accomplished was making your site beautiful. While making your site pleasing to the eyes of your readers is important, there are a lot more important things that you should be doing.
- Installing all the necessary plugins
Plugins are necessary add-ons for your site to function well. Depending on your WordPress version, some of these plugins are already installed but just in case, these are the plugins that you should install:
- Akismet Anti-spam [Akismet is quite possibly the best way in the world to protect your blog from spam. It keeps your site protected even while you sleep.]
- Google Analytics for WordPress by Monsterinsights [The best Google Analytics plugin for WordPress. See how visitors find and use your website, so you can keep them coming back.]
- OptinMonster API [OptinMonster API plugin to connect your WordPress site to your OptinMonster forms. This will enable you to build your email lists.]
- Shareaholic [The world’s leading all-in-one Content Amplification Platform that helps grow your website traffic, engagement, conversions & monetization.]
- WP Smush [Reduce image file sizes, improve performance and boost your SEO]
- Yoast SEO [The first true all-in-one SEO solution for WordPress, including on-page content analysis, XML sitemaps and much more.]
- Woocommerce [A powerful, extendable eCommerce plugin that helps you sell anything.]
There are a lot more plugins you can install to increase your site’s functionality, but take note that plugins can sometimes affect your site’s speed.
To install, go to DASHBOARD –> Plugins –> Add New
- Creating all the necessary PAGES and Categories
Before we go any further, let us first determine the difference between posts and pages, categories and tags.
Posts are content entries listed in reverse chronological order on your blog’s home page. Due to their reverse chronological order, your posts are meant to be timely. Older posts are archived based on month and year. As the post gets older, the deeper the user has to dig to find it. Posts encourage conversation. They have a built-in commenting feature that allows users to comment on a particular topic.
Pages are meant to be static “one-off” type content such as your about page, privacy policy, legal disclaimers, etc. While the WordPress database stores the published date of the page, pages are timeless entities. Sure you can go back and make updates to it, but chances are you will not have about page 2012, about page 2013 etc. Because there is no time and date tied to pages, they are not included in your RSS feeds by default. Pages are not meant to be social in most cases thus does not include social sharing buttons, or comments.
Source: WPBeginner
 Categories are meant for broad grouping of your posts. Think of these as general topics or the table of contents for your site. Categories are there to help identify what your blog is really about. It is to assist readers finding the right type of content on your site. Categories are hierarchical, so you can sub-categories.
Tags are meant to describe specific details of your posts. Think of these as your site’s index words. They are the micro-data that you can use to micro-categorize your content. Tags are not hierarchical.
Source: WPBeginner
Now that we have established the differences, these PAGES must be created and published prior to launching:
- About – the 2nd most visited page of a website. About page should tell your readers who you are, your mission, vision and goals. Don’t take this for granted and take time creating your ABOUT page.
- Contact – a no-brainer. This is for allowing your readers to connect with you.
- Legal Pages – plagiarism is rampant. So you have to protect your site from people who are grabbing articles and publishing those as their own. You don’t have to create one from scratch; there’s an available plugin that you can easily tweak.
To create a page, go to DASHBOARD –> Pages –> Add New
As for the categories, it is a MUST to create categories as these will serve as a guide to your readers. And as mentioned earlier, categories help identify what the blog is really about.
To create a category, go to DASHBOARD –> Posts –> Categories –> Add New
- MENUS
Most menus are used as a method for building navigation within a WordPress site. Depending on the theme that you use, you can have 2-3 types of menu – Primary, Secondary, and Footer menu. In my case, I only have the Primary and Footer menus. I use the Primary menu for my Categories and About and Contact page. And the footer menu is used for the Legal pages and Contact page.
To start, go to DASHBOARD –> Appearance –> Menus –> Create a New Menu
Once you’ve created a menu, you can easily drag and drop pages and categories on the Menu Structure. An indent makes the page or category a sub-header.

To know more about creating menus, read more here.
If you don’t want to go through this process of setting up your own website, you have the option of hiring web development freelancers through Fiverr.
3) Writing Quality and Relevant Content
It doesn’t matter if your website is done by a professional or have all the plugins and pages in place, if you have shitty content, no one will bother reading your blog. What do I mean by relevant and quality content? It’s a content that answers the pain points of your readers by offering a solution, giving information, or even just providing an inspirational content.
When you write, it would help to put yourself in your readers’ shoes and answer a reader’s imaginary question “What’s in it for ME?”. To empathize and understand what your readers are looking for, will definitely provide motivation to help you come up with a quality and relevant content.
Also, it’s important to include the following in your posts:
- Catchy Titles. Avoid vague titles, or titles that only you will understand. You title should already give away what your post will be all about.
- Images. A lot of your readers are visual so it will help to add images in your post. There are a lot of FREE stock photos online that you can take advantage of.
- SEO. Yoast SEO will help boost your on-page SEO ranking as long as you follow its suggestions. When you see it’s green, then the post’s SEO score is good.
- Readability. Don’t write long sentences and paragraphs. Include headings and bullet or numbered points for easy reference.
- Call-to-action. End your posts either with a question or a motivational ending. When your readers visit your blog, it’s because they found something useful and your main goal is to provide more. Your readers should feel good, inspired and/or motivated when they leave your site. Or they should carry the question you left them with and make them think but in a good way, of course.
- Internal and external links. When your posts are connected with internal links, then it presents an opportunity for your readers to stay longer on your site and the possibility of converting them to subscribers. External links, on the other hand, will provide additional information on topics that you are not an expert on (i.e. case studies, references) or links to products and services that you are recommending.
Before you launch your site, make sure that you have written at least 20 quality content so when readers land on your site, they will have several posts to click on. Also, create and regularly update a list of blog topics that you can write about.
4) Creating Digital Marketing Strategies
There are a lot of social media platforms that you can use to market your blog but I suggest that you don’t spread yourself thinly, and instead, focus your energy and resources on just 2. Here’s a guide to help you choose which ones to focus on:

Once you have chosen your social media platforms, it’s now time to create social media accounts (i.e. Facebook business page, Pinterest for business, Instagram with business feature, etc.). Once you have those social media accounts up and running, come up with social media calendar to schedule posts and content. You should have a digital marketing plan laid out at the beginning of each month so you’ll know what to expect and how to improve driving traffic to your website.
Social media marketing is just as important as writing quality and relevant content. No matter how good your content is, if it doesn’t get shared, no one will see it. And no traffic means no possibility for revenue.
Related post: How to Create a Social Media Marketing Plan
5) Signing up for Digital Ads and Affiliate Marketing Programs
Digital ads and affiliate marketing programs are ways to monetize your blog. But before you can generate income from your blog, you should first have a decent amount of traffic in your site. If you don’t have readers, or visitors, clicking through the ads, then these ads and programs will be useless.
Nonetheless, it’s still a good move to signup because you will never know when you’ll hit a breakthrough, with one of your posts going viral. That said, these are the companies that you can sign up with even if you have just started blogging:
Note: I will discuss this more in detail on another post.
6) Launching
Once you have done all these, you are now ready to launch your blog. Starting from day 1, be diligent with these 3 things:
- consistently writing quality and relevant content
- monitoring traffic to your blog
- social media marketing and networking
I’m telling you again that it ain’t going to be easy but it will be worth it. Just always remember, great things take time and dreams mean work.